Contents
开发环境设定参考 上篇文章 DirectX 9.0 C++ 教程 开发环境设定
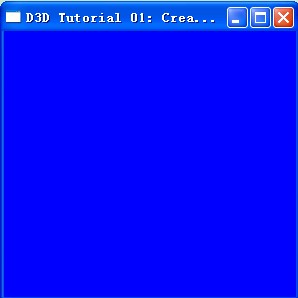
效果图:
1. 初始化 Direct3D
1.creating a Direct3D object
LPDIRECT3D9             g_pD3D       = NULL;
if( NULL == ( g_pD3D = Direct3DCreate9( D3D_SDK_VERSION ) ) )      //函数调用失败返回NULL
return E_FAIL;
2.填充 D3DPRESENT_PARAMETERS structure. 这个结构体有很多属性,具体参考SDK 文档
D3DPRESENT_PARAMETERS d3dpp;
ZeroMemory( &d3dpp, sizeof(d3dpp) );
d3dpp.Windowed = TRUE;                   //True为窗口模式,False为全屏模式
d3dpp.SwapEffect = D3DSWAPEFFECT_DISCARD;
d3dpp.BackBufferFormat = D3DFMT_UNKNOWN;
3.Create the device.
//CreateDevice 函数定义
HRESULT CreateDevice(
UINT Adapter,          //使用哪块显卡,D3DADAPTER_DEFAULT表示主显卡,电脑有些支持多块显卡
D3DDEVTYPE DeviceType, //D3DDEVTYPE_HAL,参考下面的图,如果显卡不支持某些DirectX特性,这里可以设置为D3DDEVTYPE_REF,速度会很慢
HWND hFocusWindow,//窗口句柄,这个要参考Windows 程序
DWORD BehaviorFlags, //D3DCREATE_HARDWARE_VERTEXPROCESSING性能会好些如果显卡支持这功能,D3DCREATE_SOFTWARE_VERTEXPROCESSING
D3DPRESENT_PARAMETERS *pPresentationParameters,//第二步填充的结构体
IDirect3DDevice9 **ppReturnedDeviceInterface //返回创建好的Device
);
具体例子:
LPDIRECT3DDEVICE9       g_pd3dDevice = NULL;
D3DPRESENT_PARAMETERS d3dpp;
ZeroMemory( &d3dpp, sizeof(d3dpp) );
d3dpp.Windowed = FALSE;
d3dpp.SwapEffect = D3DSWAPEFFECT_DISCARD;
d3dpp.BackBufferFormat = D3DFMT_UNKNOWN;
if( FAILED( g_pD3D->CreateDevice( D3DADAPTER_DEFAULT, D3DDEVTYPE_HAL, hWnd,
D3DCREATE_SOFTWARE_VERTEXPROCESSING,
&d3dpp, &g_pd3dDevice ) ) )
{
return E_FAIL;
}
4.Draws the scene
//Clear 函数定义
HRESULT Clear(
DWORD Count, //pRects中的矩形数量. 必须设置为 0 如果 pRects 是 NULL
const D3DRECT *pRects, //可以具体到一个矩形,设置NULL或0表示,整个 viewport 矩形
DWORD Flags,      //Flags:D3DCLEAR_STENCIL,D3DCLEAR_TARGET,D3DCLEAR_ZBUFFER
D3DCOLOR Color,   //颜色
float Z,          //Clear the depth buffer to this new <em>z</em> value,范围[0-1]
DWORD Stencil     //Clear the stencil buffer to this new value,范围 0 to 2的n次方
);
//具体例子:
g_pd3dDevice->Clear( 0, NULL, D3DCLEAR_TARGET, D3DCOLOR_XRGB(0,0,255), 1.0f, 0 );
接下来开始scene,我们这里没有绘制任何东西,所以BeginScene和EndScene中间是空的。
// Begin the scene
g_pd3dDevice->BeginScene();

// Rendering of scene objects happens here

// End the scene
g_pd3dDevice->EndScene();
2.完整代码(还需要会点Windows下面的编程,什么消息队列等):
//-----------------------------------------------------------------------------
// File: CreateDevice.cpp
//
// Desc: This is the first tutorial for using Direct3D. In this tutorial, all
//       we are doing is creating a Direct3D device and using it to clear the
//       window.
//
// Copyright (c) Microsoft Corporation. All rights reserved.
//-----------------------------------------------------------------------------
#include <d3d9.h>
#include <strsafe.h>

//-----------------------------------------------------------------------------
// Global variables
//-----------------------------------------------------------------------------
LPDIRECT3D9             g_pD3D       = NULL; // Used to create the D3DDevice
LPDIRECT3DDEVICE9       g_pd3dDevice = NULL; // Our rendering device

//-----------------------------------------------------------------------------
// Name: InitD3D()
// Desc: Initializes Direct3D
//-----------------------------------------------------------------------------
HRESULT InitD3D( HWND hWnd )
{
// Create the D3D object, which is needed to create the D3DDevice.
if( NULL == ( g_pD3D = Direct3DCreate9( D3D_SDK_VERSION ) ) )
return E_FAIL;

//Fill out the D3DPRESENT_PARAMETERS structure.
D3DPRESENT_PARAMETERS d3dpp;
ZeroMemory( &d3dpp, sizeof(d3dpp) );
d3dpp.Windowed = FALSE;
d3dpp.SwapEffect = D3DSWAPEFFECT_DISCARD;
d3dpp.BackBufferFormat = D3DFMT_UNKNOWN;

// Create the Direct3D device.
if( FAILED( g_pD3D->CreateDevice( D3DADAPTER_DEFAULT, D3DDEVTYPE_HAL, hWnd,
D3DCREATE_SOFTWARE_VERTEXPROCESSING,
&d3dpp, &g_pd3dDevice ) ) )
{
return E_FAIL;
}

// Device state would normally be set here

return S_OK;
}

//-----------------------------------------------------------------------------
// Name: Cleanup()
// Desc: Releases all previously initialized objects
//-----------------------------------------------------------------------------
VOID Cleanup()
{
if( g_pd3dDevice != NULL)
g_pd3dDevice->Release();

if( g_pD3D != NULL)
g_pD3D->Release();
}

//-----------------------------------------------------------------------------
// Name: Render()
// Desc: Draws the scene
//-----------------------------------------------------------------------------
VOID Render()
{
if( NULL == g_pd3dDevice )
return;

// Clear the backbuffer to a blue color
g_pd3dDevice->Clear( 0, NULL, D3DCLEAR_TARGET, D3DCOLOR_XRGB(0,0,255), 1.0f, 0 );

// Begin the scene
if( SUCCEEDED( g_pd3dDevice->BeginScene() ) )
{
// Rendering of scene objects can happen here

// End the scene
g_pd3dDevice->EndScene();
}

// Present the backbuffer contents to the display
g_pd3dDevice->Present( NULL, NULL, NULL, NULL );
}

//-----------------------------------------------------------------------------
// Name: MsgProc()
// Desc: The window's message handler
//-----------------------------------------------------------------------------
LRESULT WINAPI MsgProc( HWND hWnd, UINT msg, WPARAM wParam, LPARAM lParam )
{
switch( msg )
{
case WM_DESTROY:
Cleanup();
PostQuitMessage( 0 );
return 0;

case WM_PAINT:
Render();
ValidateRect( hWnd, NULL );
return 0;
}

return DefWindowProc( hWnd, msg, wParam, lParam );
}

//-----------------------------------------------------------------------------
// Name: WinMain()
// Desc: The application's entry point
//-----------------------------------------------------------------------------
INT WINAPI WinMain( HINSTANCE hInst, HINSTANCE, LPSTR, INT )
{
// Register the window class
WNDCLASSEX wc = { sizeof(WNDCLASSEX), CS_CLASSDC, MsgProc, 0L, 0L,
GetModuleHandle(NULL), NULL, NULL, NULL, NULL,
"D3D Tutorial", NULL };
RegisterClassEx( &wc );

// Create the application's window
HWND hWnd = CreateWindow( "D3D Tutorial", "D3D Tutorial 01: CreateDevice",
WS_OVERLAPPEDWINDOW, 100, 100, 300, 300,
GetDesktopWindow(), NULL, wc.hInstance, NULL );

// Initialize Direct3D
if( SUCCEEDED( InitD3D( hWnd ) ) )
{
// Show the window
ShowWindow( hWnd, SW_SHOWDEFAULT );
UpdateWindow( hWnd );

// Enter the message loop
MSG msg;
while( GetMessage( &msg, NULL, 0, 0 ) )
{
TranslateMessage( &msg );
DispatchMessage( &msg );
}
}

UnregisterClass( "D3D Tutorial", wc.hInstance );
return 0;
}程序下载:http://download.csdn.net/detail/fox64194167/4607712 (csdn下载,免积分)
Tutorial1 (本站下载。)
相关文章:
4.DirectX 9.0 C++ 教程 关于Perspective projection,Matrices,摄像头,旋转
6.DirectX 9.0 C++ 教程 Texture 纹理映射
185


[…] android DialogFragment使用 附例子 DirectX 9.0 C++ 教程 第一个程序 01 十 DirectX 9.0 C++ 教程 […]
Thanks for the amazing info. I find these posts have a lot of material. I can’t wait to get a chance to impliment all these great posts. Thank you very much.
[…] 2.DirectX 9.0 C++ 教程 第一个程序 […]
[…] 2.DirectX 9.0 C++ 教程 第一个程序 […]