Contents
1.构造函数设置data为空
constructor(props){
    super(props);
    this.state = {
      data: null
    }
  }
2.fetch 数据把data设置为ListView.DataSource
componentDidMount(){
    fetch('http://127.0.0.1/getScore/100')
    .then((response)=>response.json())
    .then((jsondata)=>{
       this.setState({
         data: new ListView.DataSource({rowHasChanged:(r1, r2) => r1 != r2}).cloneWithRows(jsondata.data),
       });
    })
    .catch((error)=>{
      alert(error);
    });
  }
rowHasChanged(prevRowData, nextRowData):指定我们更新row的策略,一般来说都是prevRowData和nextRowData不相等时更新row
cloneWithRows(dataBlob, rowIdentities): 该方法接收两个参数,dataBlob是原始数据源。在没有section的时候使用此方法,传入一个数组。rowIdentities为可选类型,为数据源的每一项指明一个id。默认的id为字符串’0′,’1′,’2’…dataBlob.count。
3. render ListView
render() {
    if(!this.state.data){
      return(
         <Text>Loading... </Text>
      )
    }else{
      return(
         <ListView
           dataSource={this.state.data}
           renderRow={(rowData)=>this.renderRow(rowData)}
         >
           </ListView>
      );
    }
  }
指定了ListView的dataSource和如何renderRow
4. RenderRow
renderRow(rowData){
    return(
       <View style={styles.lvRow}>
          <Image style={styles.img} source = { { uri: rowData.headimgurl } }/>
          <View style = { styles.textView }>
          <Text style = { styles.textTitle } numberOfLines = { 1 }> { rowData.nickname }
          </Text>
          <Text style = { styles.textContent }> { rowData.score }
          </Text>
          </View>
       </View>
    )
  }
5. Style设置
const styles = StyleSheet.create({
lvRow:{
flex:1,
flexDirection:'row',
padding:10,
},
textView: {
flex: 1,
justifyContent: 'center',
alignItems: 'center',
padding: 5,
},
textTitle: {
flex: 1,
textAlign: 'center',
color: '#f00',
},
textContent: {
flex: 1,
fontSize: 11,
color: '#000',
textAlign: 'center',
},
img:{
height:100,
width:100,
},
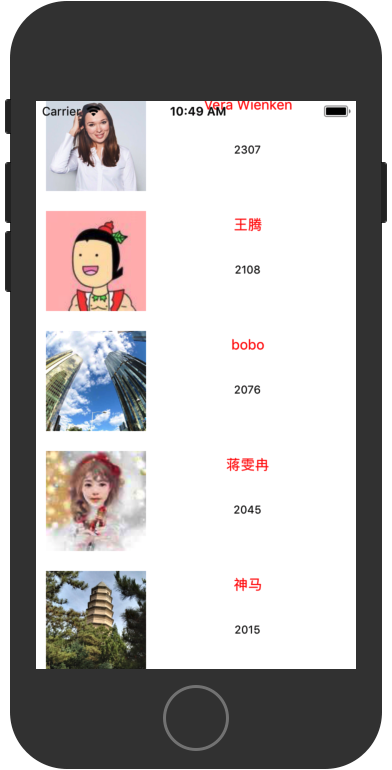
});6. 最终效果
3386