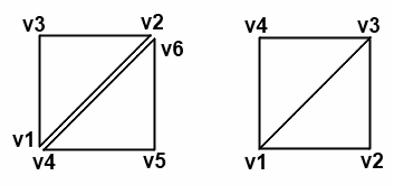
必须要先回顾下这张图,我们可以定义6个点,每3个点组成一个三角形,两个三角形组成一个矩形,但是搞计算机的总是懒或者说不喜欢重复的东西,我们也可以定义4个点,如右边的图案,V1,V2,V3组成一个三角形,然后V1,V3,V4组成另外一个三角形。
因为定义了4个点,所以我们需要更多的空间来储存来存储点了。下面是跟三角形代码不同的地方,用红色标出了。
ByteBuffer byteBuffer = ByteBuffer.allocateDirect(4 * 2 * 4);
vertices.put( new float[] { -80f, -120f,
80f, -120f,
-80f, 120f,
80f,120f});
ByteBuffer indicesBuffer = ByteBuffer.allocateDirect(6 * 2);
indices.put(new short[] { 0, 1, 2,1,2,3});
gl.glDrawElements(GL10.GL_TRIANGLE_STRIP, 6, GL10.GL_UNSIGNED_SHORT, indices);
还是上矩形代码吧,示例比较重要
package com.waitingfy.android.glbasics;

import java.nio.ByteBuffer;
import java.nio.ByteOrder;
import java.nio.FloatBuffer;
import java.nio.ShortBuffer;

import javax.microedition.khronos.egl.EGLConfig;
import javax.microedition.khronos.opengles.GL10;

import android.app.Activity;
import android.opengl.GLSurfaceView;
import android.opengl.GLSurfaceView.Renderer;
import android.os.Bundle;
import android.util.Log;
import android.view.Window;
import android.view.WindowManager;

public class FirstRectangleTest extends Activity {
	public GLSurfaceView glView;

	@Override
	protected void onCreate(Bundle savedInstanceState) {
		super.onCreate(savedInstanceState);
		// 去掉activity的标题,全屏显示
		requestWindowFeature(Window.FEATURE_NO_TITLE);
		getWindow().setFlags(WindowManager.LayoutParams.FLAG_FULLSCREEN,
				WindowManager.LayoutParams.FLAG_FULLSCREEN);
		glView = new GLSurfaceView(this);
		glView.setRenderer(new SimpleRenderer());
		setContentView(glView);
	}

	@Override
	public void onResume() {
		super.onPause();
		glView.onResume();
	}

	@Override
	public void onPause() {
		super.onPause();
		glView.onPause();
	}

	class SimpleRenderer implements Renderer {

		FloatBuffer vertices;
		ShortBuffer indices;

		public SimpleRenderer() {

			ByteBuffer byteBuffer = ByteBuffer.allocateDirect(4 * 2 * 4);
			byteBuffer.order(ByteOrder.nativeOrder());
			vertices = byteBuffer.asFloatBuffer();
			//定义四个点
			vertices.put( new float[] {  -80f,-120f,
                                          80f,-120f,
                                         -80f,120f,
                                          80f,120f});
			ByteBuffer indicesBuffer = ByteBuffer.allocateDirect(6 * 2);
			indicesBuffer.order(ByteOrder.nativeOrder());
			indices = indicesBuffer.asShortBuffer();
			indices.put(new short[] { 0, 1, 2, 1, 2, 3 });
			//indices.flip() == indices.position(0)
			indices.flip();
			vertices.flip();
		}

		@Override
		public void onSurfaceCreated(GL10 gl, EGLConfig config) {
			Log.d("GLSurfaceViewTest", "surface created");
		}

		@Override
		public void onSurfaceChanged(GL10 gl, int width, int height) {
			Log.d("GLSurfaceViewTest", "surface changed: " + width + "x"
					+ height);
		}

		@Override
		public void onDrawFrame(GL10 gl) {
			//定义显示在屏幕上的什么位置(opengl 自动转换)
			gl.glViewport(0, 0, glView.getWidth(), glView.getHeight());
			// gl.glViewport(50, 50,430, 550);
			gl.glClear(GL10.GL_COLOR_BUFFER_BIT);
			gl.glMatrixMode(GL10.GL_PROJECTION);
			gl.glLoadIdentity();
			//设置视锥体的大小,一个很扁的长方体
			gl.glOrthof(-160, 160, -240, 240, 1, -1);
			//颜色设置为红色
			gl.glColor4f(1, 0, 0, 1);
			gl.glEnableClientState(GL10.GL_VERTEX_ARRAY);
			gl.glVertexPointer( 2, GL10.GL_FLOAT, 0, vertices);
	                gl.glDrawElements(GL10.GL_TRIANGLE_STRIP, 6, GL10.GL_UNSIGNED_SHORT, indices);
		}
	}
}
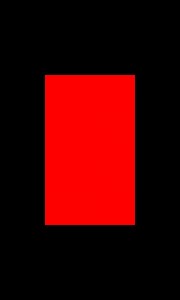
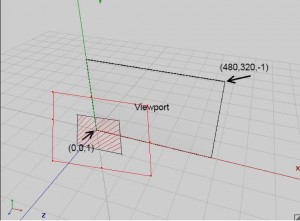
效果图和虚拟3D中的样子:


下面是示例代码下载:gl-basics


Peferct shot! Thanks for your post!